



Forget the advice to measure a plump cushion over its puff and cut your fabric to that number. To learn how to make a cushion cover that fits, measure the insert flat, seam to seam, then make the finished cover one size smaller so the insert fills it. That's the difference between a flat, baggy square and a cover with full corners that holds a dent in the top. The sewing itself is simple. Most failures happen before you switch the machine on, when the tape follows a curve, the fabric hasn't shrunk yet, or the back panels don't overlap enough.
Table of Contents
- How Do You Measure a Cushion Insert Before Cutting
- Should You Sew an Envelope Back or a Zip
- How Do You Cut and Sew a Square Cushion Cover
- How Do You Get Sharp Corners and Fix a Cover That Bags or Catches?
- Does a Homemade Cover Need to Meet Fire-Safety Rules?
- When Should You Buy a Ready-Made Pillow Cover Instead?
How Do You Measure a Cushion Insert Before Cutting
You measure a square cushion insert by laying the insert flat and running the tape seam to seam, not over the plump centre. A tape over the puff follows the curve and over-reads, so a 45 cm insert can look like 50 cm. Press the insert down gently, find the stitching at each edge, and record width and length separately even if you expect a square.
That flat measurement is your starting point, not your finished cover size. Cut the cover so the insert is one size up on it. Put plainly, a 55 cm insert goes into a 50 cm finished cover and fills every corner, while a 50 cm insert in a 50 cm cover fits but often sits flat. If a finished cover looks baggy, the usual answer is a larger insert, not a new cover.
Practical rule: An insert that fills the cover gives full corners and holds the karate chop dent in the top. A same-size insert gives you neither reliably.
What Size Should the Finished Cover Be?
Decide the finished cover size first, then add your seam allowance to the cut pieces. A common home-sewing starting point is 1.5 cm on each edge, which adds 3 cm to the cut width and 3 cm to the cut length. That's a general starting point to check on a scrap, not a specification for any bought cover.
For the one-line sizing rule applied across sizes, use the insert-to-cover sizing guide for 50 x 50 cm cushion covers rather than guessing from the label on a shop insert. The same flat-measure logic applies when you're checking larger 60 x 60 cm cushion cover sizing. Retail labels describe a nominal size. Your tape, used flat, describes the insert you own.
You don't need much kit. Gather fabric, a tape measure, pins or clips, shears, a sewing machine or a needle for a careful hand seam, and something blunt for pushing out corners. If you're ordering cloth and aren't sure how cut lengths work, fabric ordering guidance for quilters from The Fabric Company explains ordering by size in plain terms before you commit to a length.
Why Does Flat Measuring Matter So Much?
Cushion inserts compress. A plump insert pushes the tape outward at the centre, and that extra curve becomes loose fabric at the corners once the cover is sewn square. Corners are where the mistake shows first, because there's nowhere for spare cloth to hide.
Measure twice, in both directions, and write the numbers down. If width and length differ slightly, trust your tape over the label. A cover cut to the flat size, finished one size smaller than the insert, is the foundation every later step depends on.
Should You Sew an Envelope Back or a Zip
Choose an envelope back for a square cushion cover when you want no zip, and choose a zip for a square cushion cover when you want a neater opening that comes fully apart. Neither choice changes how you measure. Pick one before you cut, because the back pieces are different and you can't convert one into the other halfway through.
The comparison below sets the two square cushion cover closures side by side.
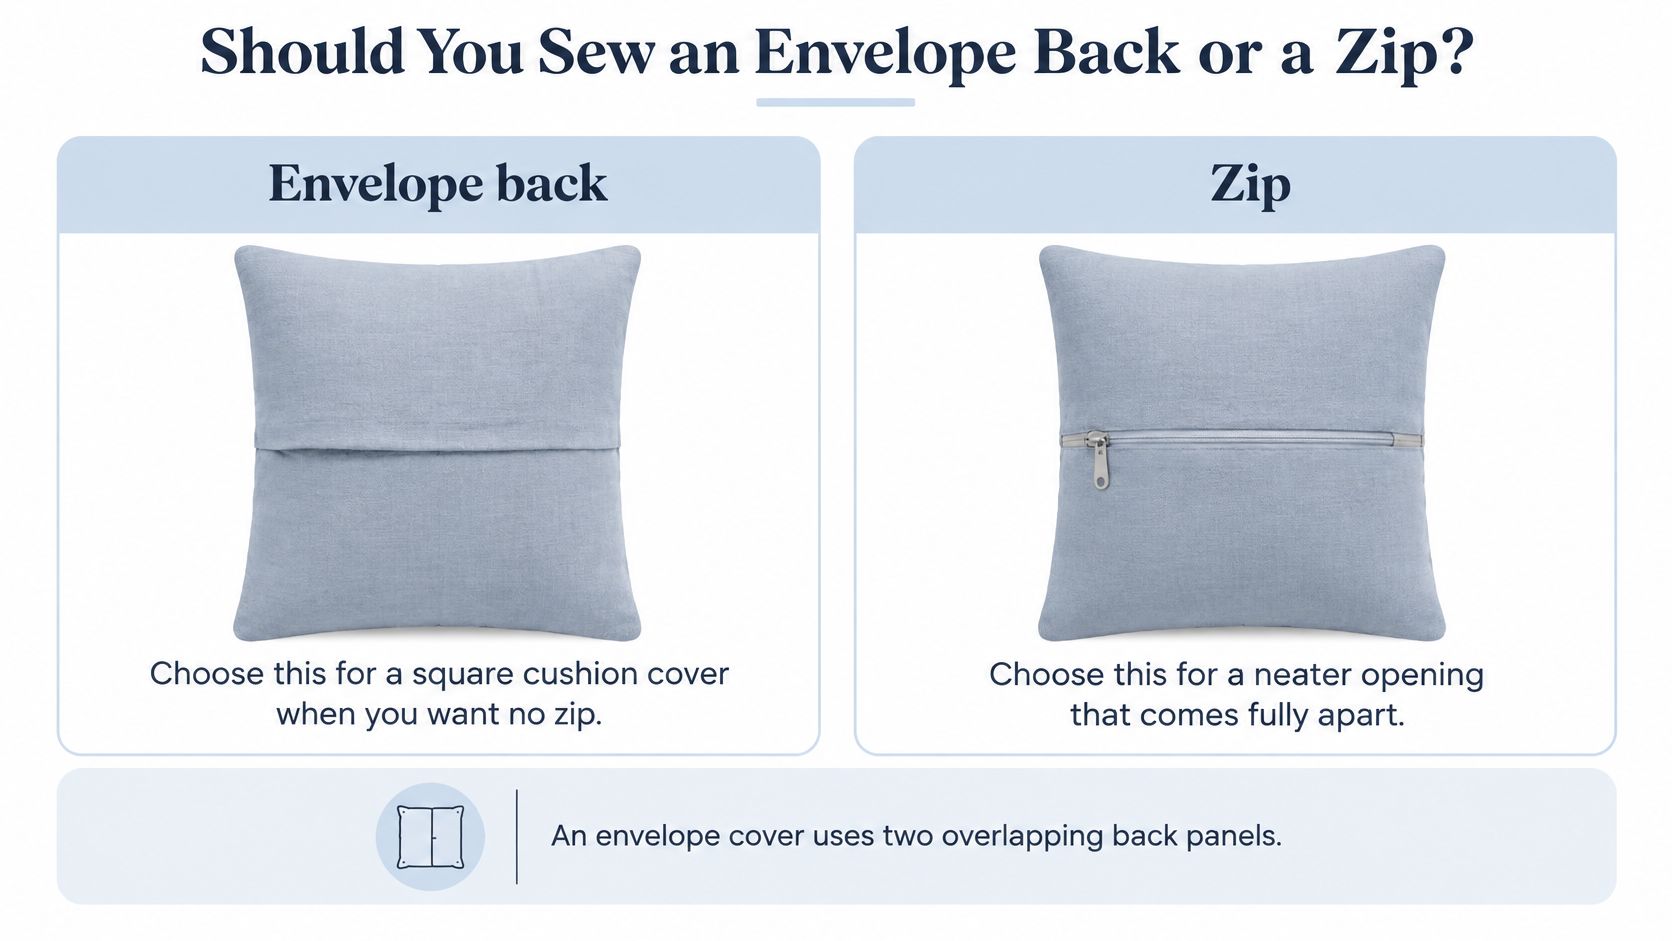
An envelope cover uses two overlapping back panels. The overlap hides the insert without any hardware, and there's nothing to catch, snag or replace. For a first cover, that's a real advantage. You sew two hems, overlap the panels, and stitch around the outside.
A zip cover uses a split back with a zip set into the opening. The edge looks tidier on the sofa and the cover comes off completely, which helps when you remove covers often. The cost is extra work and two weak points. The zip ends take the strain each time you wrestle an insert in, and filling loves to wander into the teeth when you close it.
Envelope back versus zip for a square cushion cover
| Closure | Pieces to cut | Best when | Main risk |
|---|---|---|---|
| Envelope back | One front and two overlapping back panels | A first cover with no zip hardware | Overlap too short, so the insert shows |
| Zip | One front and a split back with a zip | A neater edge you remove often | Filling caught in the teeth or strain at the zip ends |
Which Square Cushion Cover Closure Lasts Better?
An envelope back on a square cushion cover stands up to repeated removal well, provided you sew back over the ends of the overlap. Those ends take the pull every time the insert goes in. Leave them with a single line of stitching and they'll start to open.
A zip on a square cushion cover also lasts, but only if you reinforce the zip ends and keep filling clear when closing it. If you're weighing up bought zipped options against sewing, this overview of zip sofa cushion covers shows where zips help and where they get in the way.
If you can't decide, sew the envelope first. You'll learn measuring, cutting and corners without also learning zip insertion on the same project.
Don't add buttons, ties or shortcuts to your first attempt. One closure, sewn properly, teaches you more than three half-finished ideas. Decide now, then cut the back pieces to match.
How Do You Cut and Sew a Square Cushion Cover
You cut and sew a square cushion cover by cutting one centred front panel plus either two overlapping backs or a zipped split back, then sewing right sides together with the needle down at every corner. Follow the steps in order. Skipping the preparation steps is how covers end up tight, twisted or off-centre.
The sequence below shows the four main stages of a square cushion cover.
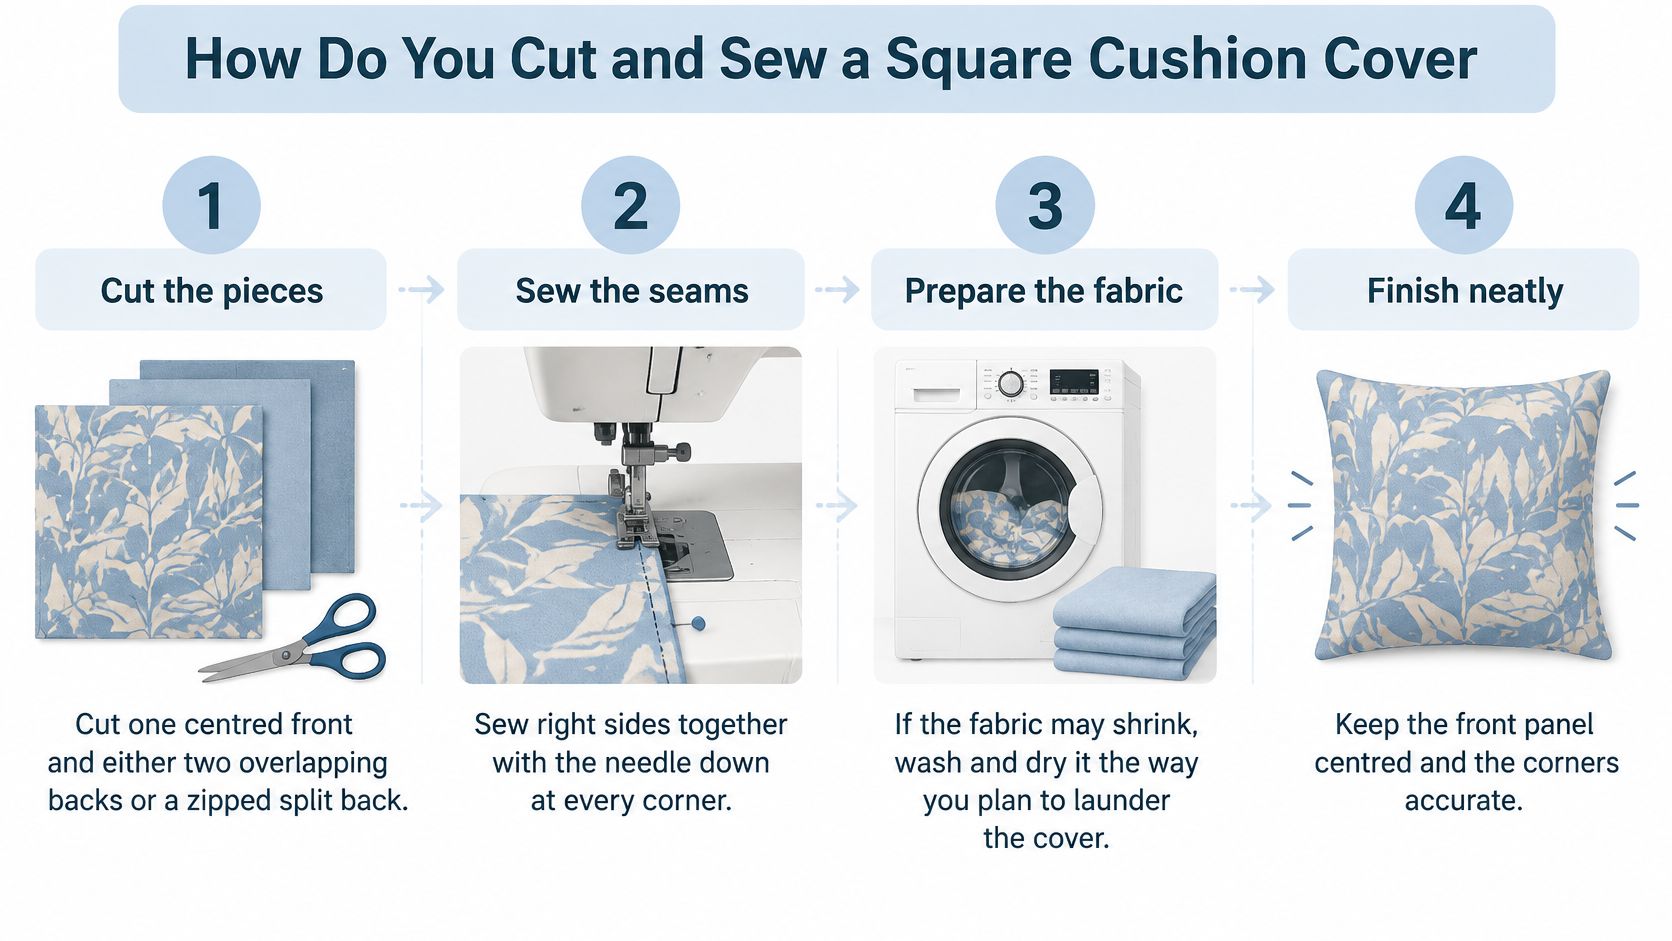
- Prepare the fabric first. If the fabric may shrink, wash and dry it the way you'll care for the finished cover, press it without stretching, and cut only once it's dry and flat. Cutting first and washing later is the most common reason a cover won't go back on.
- Cut the front panel. Keep the pattern straight and centred on the front, adding your seam allowance to the width and length. Check the centre of the pattern sits at the centre of the panel before you cut, not after.
- Cut the envelope backs. Cut two back panels the same width as the front, each long enough for half the cover plus a hem, an overlap and the outer seam allowance, so the hemmed edges overlap in the middle of the back.
- Or cut the zipped back. Cut the split back and set the zip into that opening before you join the outer seam, keeping the pattern direction the same way up as the front.
- Finish the opening edges. Zigzag or overlock the raw opening edges before assembly, then hem the envelope edges or complete the zip opening.
- Pin right sides together. For an envelope, lay the back panels over the front with hemmed edges facing inward and overlapping. Pin or clip around all four sides.
- Sew the outer seam. Stitch around all four sides, backstitching at the start and end of every seam. At each corner, stop with the needle down, lift the foot and pivot rather than curving around.
How Do You Allow for Shrinkage Before Cutting?
You allow for shrinkage on a square cushion cover by testing the actual fabric before you cut the panels. The Wolf in Textiles fabric shrinkage guide recommends securing the raw edges, marking measured distances lengthwise and crosswise, washing and drying by your intended care method, then remeasuring each direction separately. Its formula is required pre-wash dimension = desired finished dimension ÷ (1 − shrinkage rate), so a 68 cm dimension that must stay 68 cm after 4% shrinkage starts at about 70.8 cm.
Shrinkage often differs by direction, which is why one test strip isn't enough. Where possible, pre-wash the full length, press without pulling, and check the usable width afterwards. If you're still choosing cloth, this guide to sofa cover materials helps you compare how different fabrics behave in use.
Which Stitch Should a Square Cushion Cover Use?
A square cushion cover in stable woven fabric suits a lockstitched seam with properly finished raw edges. A square cushion cover in stretch fabric needs a seam that can extend with the cloth, such as a suitable overlock construction or an appropriate stretch stitch. A rigid straight stitch can break when stretch fabric extends.
These are home-sewing recommendations, not a construction specification for any shop cover. Before sewing the seam, sew a test seam on a scrap and check your actual allowance. The Three Bird Fabrics envelope cushion tutorial uses the same check, verifying a 1.5 cm seam allowance and confirming the overlap hides the insert.
Envelope back cut sizes for a 50 cm finished cover
| Piece | Cut size | How it is worked out |
|---|---|---|
| Front panel (one) | 53 × 53 cm | 50 cm finished size plus 1.5 cm seam allowance on each edge |
| Back panel (two) | 53 × 35.5 cm | 53 cm wide, and half of 50 cm plus 1.5 cm, 5 cm hem, 2.5 cm overlap and 1.5 cm seam allowance |
Treat those sizes as a starting point checked against your own insert. Before sewing, lay the two backs over the front and confirm they overlap across the whole width, folded hems included.
How Do You Get Sharp Corners and Fix a Cover That Bags or Catches?
Sharp corners on a square cushion cover come from trimming the seam allowance diagonally across each corner, close to the stitching without cutting it, then pushing each corner out and filling it with the insert. A square cushion cover that bags usually has an insert that's too small. A square cushion cover that catches usually has filling sitting in the zip teeth.
The finishing sequence below shows a floral square cushion cover being turned, filled and settled into its corners.
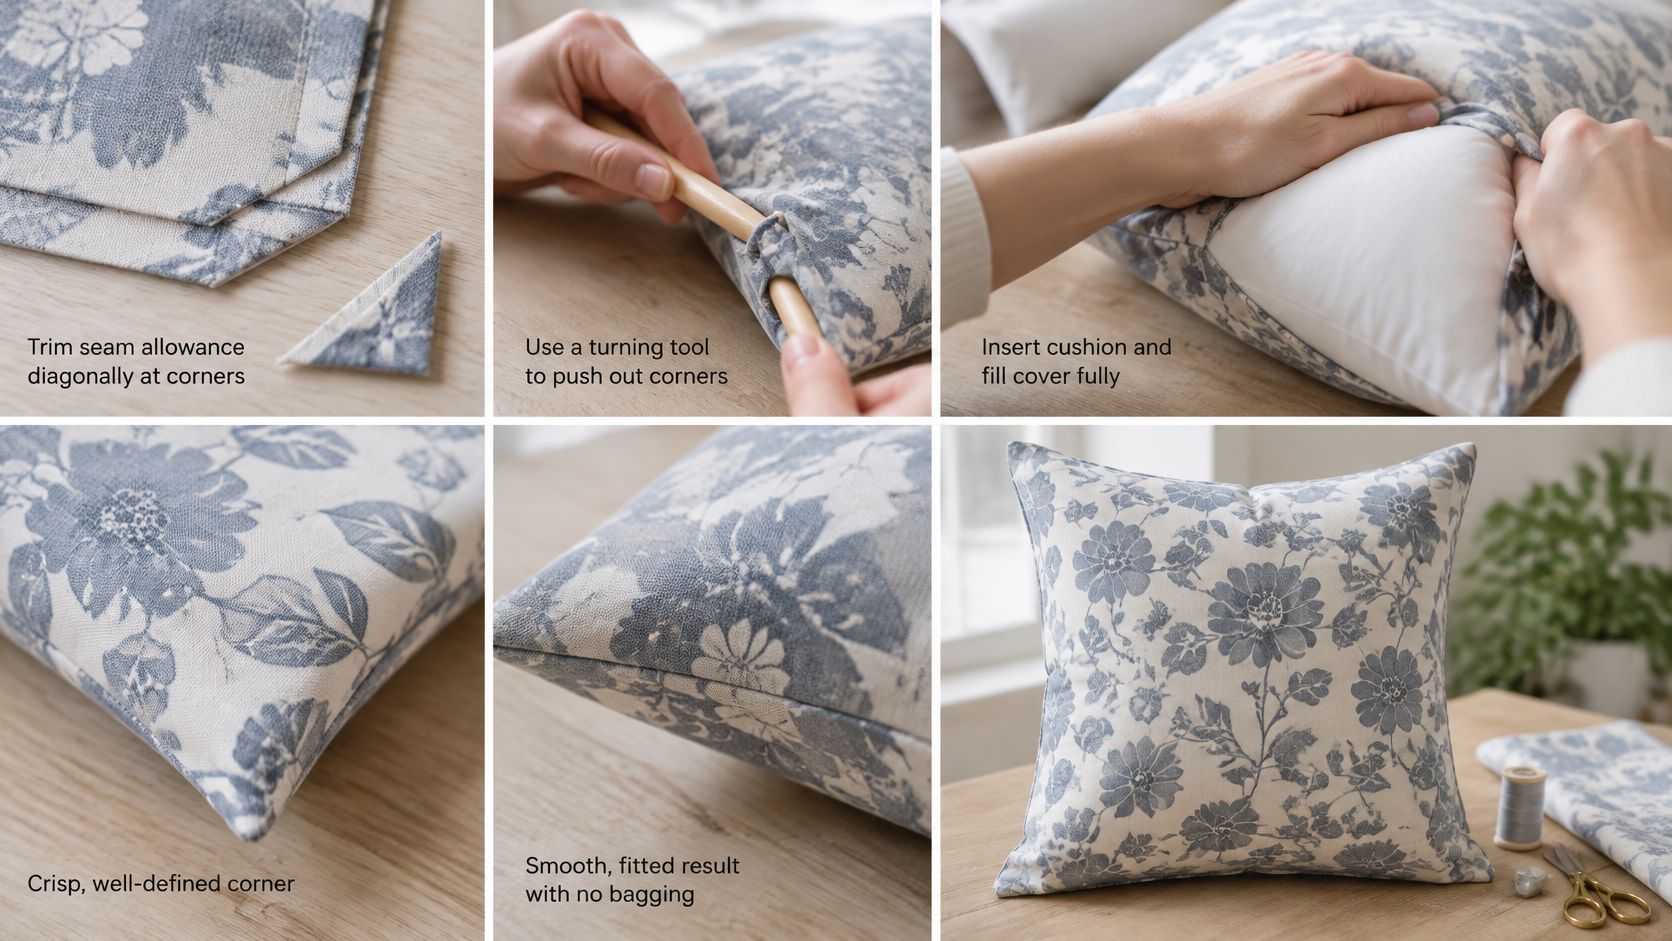
After the outer seam, trim each corner diagonally so no folded wad of fabric sits inside the point. Turn the cover through and push each corner out from inside with something blunt, such as a chopstick, never scissors. Scissor points can pierce the stitching you just sewed.
Pointed dog ears are a different problem. A dead-square cover filled with a plump insert pushes fabric into points at the corners. Prevent them at the cutting stage by tapering each edge very slightly towards the corners, so the finished shape allows for the insert's bulk.
How Do You Finish and Fill a Square Cushion Cover?
You finish a square cushion cover by zigzagging or overlocking any raw edges still open, because fraying creeps inwards to the stitch line and opens the seam. Sew back over the ends of the envelope overlap and reinforce the zip ends. Both areas take the pull every time the insert goes in or out.
Fit the insert by pushing a hand into each corner of the cover, gripping the insert corner through the fabric, and pulling it into place. Work around all four corners rather than shaking the cushion and hoping. On a zipped cover, keep filling clear of the teeth as you close the zip, easing it away with your fingers ahead of the slider.
The short demonstration below shows the turning and corner shaping stage on a square cushion cover.
Cushion cover problems and the fix
| What you see | Likely cause | Fix |
|---|---|---|
| Cover looks baggy or will not hold the karate-chop dent | Insert is the same size as the cover | Use an insert one size up, measured flat seam to seam |
| Pointed dog ears at the corners | Edges cut dead square | Taper each edge slightly towards the corners and refill |
| Insert shows through the back | Envelope overlap too short | Recut the backs with a deeper overlap and sew the ends back |
| Seam frays open | Raw edges left unfinished | Zigzag or overlock, then restitch the opened length |
| Zip catches when closing | Filling sits in the teeth | Clear the filling and reinforce the zip ends |
| Cover feels tight after washing | Cut before the fabric finished shrinking | Wash, dry and press the cloth, then cut again |
Work down the table before you unpick anything. Half of these faults need a different insert or a cleared zip, not new sewing.
Does a Homemade Cover Need to Meet Fire-Safety Rules?
Yes, a homemade cover for upholstered furniture in the UK needs to be considered under the Furniture and Furnishings (Fire) (Safety) Regulations 1988, and sewing a cover yourself doesn't prove the furniture beneath complies. The 1988 Regulations on legislation.gov.uk require relevant loose covers other than stretch covers to pass the match test in Part I of Schedule 5. Stretch covers fall under Part II instead.
That classification comes before fabric shopping. A loose woven cover and a stretch cover follow different test routes, so identify which type you're making first. The regulations also require permanent labels on relevant upholstered items and on covers other than permanent covers, subject to stated exceptions.
Scatter cushions sit differently in the rules. The current consolidated regulations text excludes pillows and cushions from some upholstery rules but still controls cushion filling, which must pass the relevant ignitability test. Crumb foam may not be used unless it's derived from combustion-modified foam. Replacing filling is therefore a separate question from sewing a cover.
This matters most if you supply furnished property. Bromley Council guidance on the 1988 Regulations states the rules apply to upholstered furniture supplied in rental accommodation, which covers landlords and Airbnb hosts. Check the current regulation text or your local authority guidance before supplying or renting out furniture wearing a homemade cover. Keep the original furniture label accessible rather than sewing over it.
When Should You Buy a Ready-Made Pillow Cover Instead?
A bought cover can be the better job, but only if its size suits the cushion. Measure the insert flat, seam to seam, before deciding. If it measures 45 x 45 cm, a ready-made pillow cover is an option. For another size, sewing your own lets you make the cover slightly smaller than the insert, so the filling reaches the corners instead of leaving them empty.
The ready-made pillow cover collection offers an alternative to cutting and sewing. For example, the Classic Stretch Pillow Cover in Red Cherry is one option. The Sofa Cover Crafter's pillow covers use elastic fabric for an easy application and snug fit, and high-density fabric to help protect against stains. They are machine washable, which makes routine care simpler.
Seat and back cushions need a different kind of cover from scatter cushions. The fitted sofa cushion cover collection is designed for individual sofa cushions. Measure each cushion's length, width and thickness to choose a suitable cover. For irregular shapes, stretch covers and anti-slip foam rods can help create a snug fit and smooth out creases. If you are covering the whole sofa instead, consider the Sofa Cover - Velvet - Dark Green - Adaptable & Expandable.
Before ordering, compare your flat measurement with the product details and use the store's Size Guide and Installation Guide for help. Then choose the route that fits the job: a ready-made pillow cover for a matching flat-size cushion, a sewn cover for a different-sized scatter cushion, or a fitted cover for sofa cushions.
